
In production computer vision deployments, running object detection across the entire video frame is often wasteful and noisy. Consider a retail store where you only care about detections near the checkout counter, or a smart parking system where only a specific bay needs monitoring. Feeding the full frame to your model means wasting compute on irrelevant regions and generating false alarms from areas you never intended to monitor. Computer vision in a retail store can transform the operations, but false alarms can be disruptive.
The solution is a Region of Interest (ROI), a user-defined polygon that tells your pipeline: only pay attention to what happens inside this boundary. In modern systems, this polygon is drawn by an operator on a frontend interface and its coordinates are sent to the backend, where the vision pipeline enforces the zone.
In this blog, we explore three battle-tested approaches to implementing ROI filtering in your vision AI pipeline, each with its own trade-offs in speed, accuracy, and implementation complexity.
Setting Up the Zone from the Frontend
Before diving into the three methods, let us look at how the polygon coordinates are captured. A typical setup involves an HTML5 canvas overlaid on a live video feed. The operator clicks to mark the corners of the zone, and those coordinates are sent to the backend as a JSON array of points.
					// Frontend: capture polygon coordinates on canvas click
const polygon = [];
canvas.addEventListener('click', (e) => {
  const rect = canvas.getBoundingClientRect();
  polygon.push({ x: e.clientX - rect.left, y: e.clientY - rect.top });
  drawPolygon(polygon);
});
// Send to backend
fetch('/api/set-zone', {
  method: 'POST',
  headers: { 'Content-Type': 'application/json' },
  body: JSON.stringify({ polygon })
});
Setting Up the Zone from the Backend
On the backend (Python), you receive this array and convert it into a NumPy array that OpenCV understands:
					import numpy as np
# Received from frontend POST body
polygon_data = [[100, 150], [400, 150], [400, 450], [100, 450]]
polygon_pts = np.array(polygon_data, dtype=np.int32)
Method 1: Detect All, Then Filter Using pointPolygonTest
How It Works
This is the most straightforward approach. You run your model on the full frame as usual, then for each detected bounding box, you compute its center point and test whether that center lies inside the defined polygon using cv2.pointPolygonTest(). Detections with centers outside the zone are simply discarded.
cv2.pointPolygonTest() returns a positive value if the point is inside the contour, zero if it is exactly on the boundary, and a negative value if it is outside. This makes the check clean and reliable even for concave polygons.
					import cv2
import numpy as np
# Polygon received from frontend as list of [x, y] points
polygon_pts = np.array([[100, 150], [400, 150], [400, 450], [100, 450]], dtype=np.int32)


def is_inside_zone(bbox, polygon):
    """Check if the center of a bounding box lies inside the polygon."""
    cx = int((bbox[0] + bbox[2]) / 2)
    cy = int((bbox[1] + bbox[3]) / 2)
    result = cv2.pointPolygonTest(polygon, (cx, cy), False)
    return result >= 0  # >= 0 means inside or on the boundary


# Run inference on the full frame
results = model(frame)


# Filter detections to only those inside the zone
filtered = []
for det in results.detections:
    if is_inside_zone(det.bbox, polygon_pts):
        filtered.append(det)
        cv2.rectangle(frame, (det.bbox[0], det.bbox[1]),
                      (det.bbox[2], det.bbox[3]), (0, 255, 0), 2)
When to Use This Method
- Your polygon is irregular or concave and slicing is not straightforward
- You want maximum detection accuracy since the full frame context is preserved
- Compute cost is not a hard constraint
- You are already running full-frame inference and just need to filter results
The main downside is that you are paying the full inference cost even for parts of the frame you do not care about. For high-resolution streams or resource-constrained edge devices, this can be a bottleneck.
Method 2: Slice the Frame and Feed Only the ROI to the Model
How It Works
Instead of running inference on the full frame, you extract only the pixels within the bounding rectangle of your polygon, resize if necessary, and feed that smaller crop to the model. Since the input resolution is significantly smaller, inference runs faster and uses less memory.
The key step is computing the axis-aligned bounding rectangle of the polygon using cv2.boundingRect(), slicing the frame using NumPy array indexing, and then translating the resulting bounding box coordinates back to the original frame’s coordinate space for visualization.
					import cv2
import numpy as np


# Polygon received from frontend
polygon_pts = np.array([[100, 150], [400, 150], [400, 450], [100, 450]], dtype=np.int32)


def get_bounding_rect(polygon):
    """Get the axis-aligned bounding rectangle of the polygon."""
    x, y, w, h = cv2.boundingRect(polygon)
    return x, y, w, h


def run_on_slice(frame, polygon):
    x, y, w, h = get_bounding_rect(polygon)


    # Slice the frame to the bounding rectangle
    roi = frame[y:y+h, x:x+w]


    # Shift polygon coordinates relative to the sliced ROI
    shifted_poly = polygon - np.array([x, y])


    # Run model only on the sliced region
    results = model(roi)


    # Translate detections back to original frame coordinates
    for det in results.detections:
        det.bbox[0] += x;  det.bbox[2] += x
        det.bbox[1] += y;  det.bbox[3] += y


        # Optionally filter by polygon within full frame
        cx = int((det.bbox[0] + det.bbox[2]) / 2)
        cy = int((det.bbox[1] + det.bbox[3]) / 2)
        if cv2.pointPolygonTest(polygon, (cx, cy), False) >= 0:
            cv2.rectangle(frame, (det.bbox[0], det.bbox[1]),
                          (det.bbox[2], det.bbox[3]), (0, 255, 0), 2)
When to Use This Method
- Your zone is roughly rectangular or compact
- You are working on resource-constrained hardware such as a Raspberry Pi or Jetson Nano
- The objects of interest are unlikely to span the edge between the zone and the rest of the frame
- Inference latency is a primary concern
One subtlety: the model receives a cropped view and loses the broader scene context. This can slightly reduce accuracy for models that benefit from scene-level features. Additionally, objects at the very border of the bounding rectangle but outside the polygon may still be detected; a secondary pointPolygonTest check is recommended for strict filtering.
Method 3: Mask the Frame Using cv2.bitwise_and()
How It Works
This approach is conceptually elegant. You create a binary mask, a black image of the same dimensions as the frame, and then fill only the polygon area with white. Applying cv2.bitwise_and() between the frame and itself using this mask produces a new frame where every pixel outside the polygon is zeroed out (black), while the pixels inside are preserved exactly.
You then feed this masked frame directly to the model. Since the model sees a zero-value background everywhere outside the zone, its attention is naturally directed toward the valid region. No post-processing filter is needed.
					import cv2
import numpy as np


# Polygon received from frontend
polygon_pts = np.array([[100, 150], [400, 150], [400, 450], [100, 450]], dtype=np.int32)


def apply_zone_mask(frame, polygon):
    """Black out everything outside the polygon using bitwise AND."""
    mask = np.zeros(frame.shape[:2], dtype=np.uint8)


    # Fill the polygon area with white (255)
    cv2.fillPoly(mask, [polygon], 255)


    # Apply mask: keeps pixels inside polygon, blacks out the rest
    masked_frame = cv2.bitwise_and(frame, frame, mask=mask)
    return masked_frame


# Apply mask before feeding to the model
masked = apply_zone_mask(frame, polygon_pts)


# Run inference only on the masked frame
results = model(masked)


for det in results.detections:
    cv2.rectangle(frame, (det.bbox[0], det.bbox[1]),
                  (det.bbox[2], det.bbox[3]), (0, 255, 0), 2)
When to Use This Method
- You need the model itself, not just your post-processing code, to be unaware of context outside the zone
- Your polygon is highly irregular or non-convex and slicing would include too much irrelevant area
- You want a clean visual debug output showing exactly what the model sees
- Working with segmentation or anomaly detection models that are sensitive to out-of-zone pixels
The trade-off here is that you are still passing a full-resolution frame to the model, so the inference cost is the same as Method 1. However, the model’s internal feature maps only see valid pixels, which can improve precision in sensitive deployments.
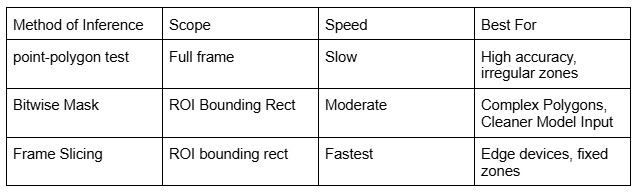
Comparing the Three Methods
Here is a quick summary of when each approach shines:
Conclusion
Restricting your vision AI model to a specific region of interest is a small architectural decision that pays significant dividends in production: lower compute costs, fewer false positives, and more focused alerting.
To summarize the decision framework: use Method 1 (pointPolygonTest) when you prioritize accuracy and your zone is non-rectangular. Use Method 2 (frame slicing) when you are optimizing for speed on resource-constrained hardware. Use Method 3 (bitwise masking) when you need the model itself to only see the zone, particularly with segmentation or generative models where out-of-bound context leaks into predictions.
All three methods integrate naturally with a frontend that sends polygon coordinates as JSON. Whether you are building a smart camera, a retail analytics system, or an industrial inspection tool, one of these approaches will fit your deployment scenario cleanly.
At Xcelore, an AI development company, we unlock the power of visual data through cutting-edge computer vision solutions that drive innovation and operational efficiency. For AI-video analytics services, contact us.